

Salty Sam’s Fun Blog for Children
Number 231
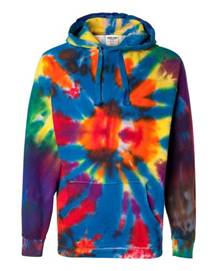
Tie-Dyeing
Hello Everyone
As l have already told you, the children spend a lot of time with Auntie Alice during the school holidays while their parents are at work.
The other day, Auntie Alice was looking for something in her cupboard.
There was so much stuff in there some of it fell out onto the floor.
A small, round container rolled out over the carpet and landed at Bill’s feet. He picked it up and wondered what it was.
Auntie Alice explained that it was a dye that you can use to colour fabric. You could get a white garment like a T-shirt and dye it any colour that you liked.
What was more, if you tied the garment up in some way so that the dye could not penetrate the fabric in some places, some areas would be left as the original colour of the garment.
The exciting thing was that you never knew exactly how your project would turn out and everything you make – just like marbling paper, would be unique.
This craft was called tie-dyeing.
Of course, the children wanted to have a go at tie-dyeing.
Luckily, Auntie Alice knew how to do it and she said that she would teach them.
Tie-dyeing was a term invented in the 1960s and was associated with hippy gear. The children thought it would be good to create their own 21st century, tie-dye T-shirts.
ln fact, this activity is quite an ancient technique associated with ethnic art. lt is popular in Africa, South America and all over Asia and has been used for hundreds and hundreds of years to decorate fabric.
Auntie Alice said that the children should all choose which colour they wanted their T-shirts to be. They could buy some white T-shirts and some colour dyes to use.
Then they would decide which process they would use to create a pattern on the T-shirt. They could fold, twist, pleat or crumple the fabric – or they could stitch across it and then bind it with string or rubber bands.
Stitching creates a sort of white, dotted line effect.
Auntie Alice said that it would be a nice craft for the children to try out – and they were keen to get started.
She said they could buy what they needed in the Rocky Bay Supermarket and craft section of the Rocky Bay Department Store. She said that people can make dyes out of natural substances at home but it might be easier to buy the dyes they needed from a shop to get started.
They would also need to buy some white T-shirts with high-cotton content – at least 60%.
The next morning they all went shopping together.
Auntie Alice, Emily, Henry and Bill and Bob went into town.
Auntie Alice had a list of all the things they would need to buy. She already had some old buckets and some old string that they could use. She also had quite a lot of large, thick, rubber bands that her postman had given her to keep in her crafting cupboard.
So after they had been shopping, they were ready to get started.
First, they washed the T-shirts and left them to dry. This would help to remove any dust or finishes left on them by the manufacturers. lt didn’t take long for the shirts to dry in the breeze and in the afternoon they were ready for the children to start working on them.
The children twisted and knotted the shirts and tied the fabric up with elastic bands and string, prepared the dye and the T-shirts according to the instructions that came with the dye and then they soaked the shirts in their chosen colours.
They were careful to wear old clothes, rubber gloves on their hands and they used old buckets for dye baths.
They worked in the garden so that if they splashed any dye, it would not ruin anything in the house.
They put old cloths over the buckets so that no bee could fall into the liquid.
Auntie Alice said that because they were using white T-shirts they should get the exact colour they wanted from the dye. But if they, for example, dyed a yellow T-shirt with red dye, it would come out an orange colour and if they dyed a red T-shirt with blue dye, they would get a purple T-shirt.
She said that if they ever wanted to try colouring anything with two or more colours, they should start with the lightest colour first. Using two colours of dye will produce three colours because they will create a third colour when the two colours run together. For example, yellow and red dye will produce yellow, orange and red on the T-shirt and of course there will be white patches as well.
You have to let the T-shirt dry after the yellow dye bath and tie or bind the T-shirt up some more so that the red will create another pattern on top of the yellow.
You could use primary colours together or secondary colours together. Primary colours are red, yellow and blue and secondary colours are orange (red and yellow together), green (yellow and blue together) and purple (blue and red together).
lt is not a good idea to use more than three colours and it is a good idea to choose colours that should look well together.
Scrunching fabric into a ball and wrapping rubber bands around it in different directions will create a marble effect.
Stripes are made by folding the fabric vertically or diagonally and wrapping bands tightly around it at intervals.
Spirals are formed by the fabric being twisted.
The tighter the fabric is bound, the less the dye can penetrate, so the more white patches are left (or the original colour of the fabric anyway).
Another method you can use to dye garments is dip-dying. You can hang a T-shirt on a hanger and at timed intervals lower it into a bowl of dye. This will create an effect where the bottom of the garment has a deeper colour than the top because it has been in the dye for a longer time. The effect will be a gradual deepening of colour down the whole length of the shirt.
lf you want to do this, you might want to use a cooking timer to help you. You must concentrate on what you are doing and not forget the time. You might also want to put tiny pencil marks up the garment using a ruler before you start. The garment must be dropped in equal lengths for an equal duration of time each time it is dropped – otherwise you will not have an even result.
lt helps if you tie some string to the top of the coat hanger and tie the string to something high above the dye bath so that you can control your adjustments easily over the dying time.
So the children had to wait for their dye to work, but it wasn’t easy to be patient.
The T-shirts were a lot heavier to lift when they were wet, but not too heavy for the children to manage.
They had to undo the wrappings using some scissors. They carefully cut the string because it had been tied so tightly.
Then they rinsed the shirts in cool water until no more dye was leaking out of them.
They washed the T-shirts in warm water and mild washing detergent and rinsed them in cool, clean water, squeezed them gently and then they hung all the shirts on the line to dry.
The whole process from buying what they needed, to seeing their newly designed T-shirts took all day to do.
The most boring part was waiting for the dye to soak into the T-shirts. Auntie Alice said that they didn’t need to sit and watch it; they could go and play in the garden instead.
The most exciting part was seeing what patterns appeared on their shirts.
And so over the whole day the children had learnt a lot of different interesting things about fabrics and dyes and colours.
But the most interesting thing they learnt was that – Auntie Alice had once been a hippy!!!
Bye bye everyone – don’t forget to subscribe to my blog!
lf you like my blog, please support it by telling all your friends and followers about it.
Thank you!
And see you again next Fun Friday!
Love and kisses
Salty Sam

www.christina-sinclair.com

Bill and Bob’s Joke of the Week![]()
![]()
Bill: Why didn’t the boy want to go to work in the wool factory?
Bob: l don’t know. Why didn’t the boy want to go to work in the wool factory?
Bill: Because he thought he was too young to dye.
Salty Sam © Christina Sinclair 2015
Unauthorized use and/or duplication of material from this blog without express and written permission from this blog’s author and owner is strictly prohibited.
Links may be used to www.christina-sinclair.com
Picture Gallery
 Tie dye
 Peace symbol
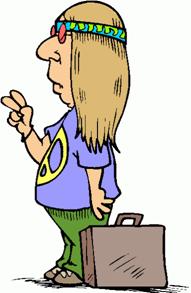 Hippy
Hippy
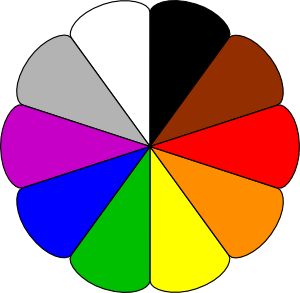
Mixing colours can make new ones
 THE SALTY SAM NEWS DESK

When the children’s T-shirts were dry and ready to wear, of course they wanted to wear them out somewhere to show them off.
Auntie Alice said that she thought that because the children would be spending so much time at her house over the next few few weeks, they should each have a toothbrush to keep there.
They could each have a different colour so that they could tell them apart.
So the five of them trekked down to the Rocky Bay Supermarket to do some shopping.
When people saw the colourful T-shirts the children were wearing, they asked if they had fallen out of a rainbow! The children were pleased that they were having such an impact with their self-designed clothes.
While they were walking around the supermarket Auntie Alice had an idea.
She bought a few bottles of food colouring to take home.
When they got there, they all spent the afternoon making cupcakes with different coloured icings.
They took the cakes out in the garden to have a picnic on the lawn.
And after they had eaten a pile of home-made cakes, they all needed to use their new toothbrushes!

*********************
*********************

Quick Quiz
And here are four more column word puzzles for you to do.
Draw four columns of boxes – they should be three boxes across and five boxes down.
Answer the questions and put one letter in each box to find four colours reading down the beginning of the words.
- the opposite to lose
- something to wear on your head
- the liquid inside your pen
- to pull something behind you
- finish
- a space between things
- a male sheep
- a female sheep
- what you use to see
- nothing
- an animal that flies at night
- once around the track
- what you plan to achieve
- a pet that likes to chase mice
- a collection of things
- where you put your waste paper
- a small tear in paper or fabric
- to be bound to repay someone money
- a person who has clever and funny conversation
- the present moment


lt’s the Weekend!

HOW TO MAKE A FLARED SUMMER DRESS FOR A 12” DOLL
This outfit is perfect for a summer’s day.
DRESS BODICE (KNIT ONE)
Using 4mm knitting needles and pale blue dk yarn cast on 25 stitches
Knit 2 rows of garter stitch
Slip 1 (knit 1, purl 1) repeat last 2 stitches to end of row
Repeat the last row 13 times (14 rows of moss stitch)
Change to white dk yarn
Knit 1 row
Knit 1 row
Cast off
Sew up the back seam with right sides together to make a tube
Turn right sides out
DRESS SKIRT (KNIT TWO)
Using 4mm knitting needles and white dk yarn cast on 41 stitches
Purl 1 row
Purl 1 row
Knit 1 row
Knit 1 row
Change to pale blue dk yarn
Slip 1 (knit 1, purl 1) repeat last 2 stitches to end of row
Repeat the last row 29 times (30 rows of moss stitch)
Don’t cast off – instead thread a length of yarn through the stitches you have on the needle
Sew up side seams of skirt with right sides together
TO MAKE UP
Using over-sew stitching and with right sides together attach top to skirt.
Do this by putting the bodice (right sides out) upside down into the skirt as it is inside out.
Ease the top of the skirt in so that it will gather around the base of the top.
Pin together before you start sewing and check that all the side and back seams are in place before you start sewing.
Sew around the rim of the base of the bodice inside the top of the skirt using over-sew stitching.
*This is not easy to do so you must keep checking that everything is lined up properly – you may even need to employ the help of an adult for this part.
Crochet 25 chains into 4 lengths of white yarn and attach to the front and back of the dress to create shoulder straps
Tie the straps into bows

Please note that the material on this blog is for personal use and for use in classrooms only.
It is a copyright infringement and, therefore, illegal under international law to sell items made with these patterns.
Use of the toys and projects is at your own risk.
©Christina Sinclair Designs 2015
Quick Quiz Answers
- WlN
- HAT
- lNK
- TOW
- END
- GAP
- RAM
- EWE
- EYE
- NlL
- BAT
- LAP
- AlM
- CAT
- KlT
- BlN
- RlP
- OWE
- WlT
- NOW

For an Embroidery Stitches Chart
Check out Blog Post 3
I like the valuable information you supply for your articles. I’ll bookmark your blog and check again right here frequently. I am relatively sure I will be told lots of new stuff proper here! Good luck for the next!
Thank you Marylin!