Salty Sam’s Fun Blog for Children
Number 371
Working Together
Hello Everyone

There was a bit of an argument in one classroom at the Rocky Bay Primary School the other day. lt all got a bit rowdy in there!
Bill and Bob were telling me all about it.
Miss Pringle had given her class some group projects to do and the children weren’t being very co-operative.
lt was just like they had all got out of the wrong side of the bed that morning!
Miss Pringle said they should all sit back at their own desks and she would have a chat with them.
Miss Pringle said that everyone in the room spent a lot of time together during the week and had to make the effort to get on.
What was more; getting on with other people was a life skill that they would need when they grew up and started working in a job.
Productivity in any place where work was being done was better when people co-operated.
She would give them a few tips…
A friendly smile can show warmth to other people. Try smiling at people you pass in the street. They will most likely smile back!
lf you show respect to other people and are willing to learn from them, they will probably show respect back.
This leads neatly onto the next point – that you must listen to people.
That means really hear what they are saying rather than just thinking about what you are going to say next.
Everyone in the group has a right to be heard. Anyone could have a good idea – not just the person with the loudest voice.
You need to be able to trust people. This means that, for example, if someone tells you a secret, you must keep the secret. Just telling one other person is not keeping that secret. Even adults have trouble doing this! They just can’t help themselves from gossiping.
You should only tell the secret if somebody’s safety depends on it.
Always be polite to people.
When you are in a rush it is sometimes difficult to find time to talk to people for very long, but you can always say ‘please’ and ‘thank you’. They will like you better for it and be more co-operative because you have treated them well.
You should be kind to everyone, because everyone matters.
You should not just be nice to people because you think you can get something from them.
lf there is disagreement, the most important thing to do is keep calm.
Losing your temper is not the right way forward.
lf everyone is trying to solve a problem, the task should be easier.
There are times when only solving a problem is important, rather than getting your own way.
Solving problems is about firstly defining what the problem is that you have to solve, before you start to find a solution.
When everyone is in agreement with that, you can discuss action to be taken.
Brainstorming is a good start to a discussion.
When coming up with a list of action points you have to make sure that they are all realistic and manageable. That means that it will be possible for you to carry them out.
Then when you start to take action, everyone has to be clear on what part they are responsible for in the whole project.
Don’t make assumptions that everyone understands what part they will play in a project – get feedback to check everyone understands what everyone is going to do.
You know when your teacher says, “What did l just say?”
(And then probably nobody says anything because they weren’t listening!)
Well, that is getting feedback.
And in that case, the feedback is that nobody was listening because nobody was able to say what the teacher just said!
You need people to clearly state what they are going to do as their part of the project. Then they know what they need to do.
Anyway…
Miss Pringle said that the children could go off on their break and they could start again on their projects once they had all cooled off a bit and had a think about what she had told them.
Maybe they would then actually manage to get some work done.
lf you like my blog, please support it by telling all your friends and followers about it.
Thank you!
And see you again next Fun Friday!
Love and kisses
Salty Sam

www.christina-sinclair.com


Bill and Bob’s Joke of the Week![]()
![]()
Bill: What did the caterpillar family say before they started eating their dinner?
Bob: l don’t know. What did the caterpillar family say before they started eating their dinner?
Bill: Lettuce pray!
Salty Sam © Christina Sinclair 2015
Unauthorized use and/or duplication of material from this blog without express and written permission from this blog’s author and owner is strictly prohibited.
Links may be used to www.christina-sinclair.com

Picture Gallery
 THE SALTY SAM NEWS DESK

Some of the plants we put into Auntie Alice’s hedgerows last week were some elderflower bushes, and hopefully they will grow because they are very pretty plants.
There are 118 named varieties of elderflower. They provide a wonderful hedgerow harvest of flowers in the spring and berries in the autumn.
Of course, you won’t get any berries if you have picked all the flowers at the beginning of the summer.
They have white or pink flowers and you can make a cordial from them or a kind of champagne as well.
They only flower for about two weeks in late spring but their flowers have all sorts of different scents. They can smell of fruit or almonds and some of them have a citrus smell.
You can use elderflowers to make a cordial that can be mixed with fizzy water to make a lovely summer drink. You can put your cordial onto a fruit salad.
You need to store it in the fridge in clean bottles or even frozen in plastic containers to keep it long-term.
You will need to pick 25 flower heads to make this recipe and you will need to wash them well to make sure that there are no creepy-crawlies hiding inside them…
The first thing you have to do is find a very large bowl or bucket and make sure it is very clean before you start mixing your cordial up in it.
INGREDIENTS
Put 1 kg (2lb) sugar in the bowl
Measure out 1.75 (3 pints) of water that has been boiled in a kettle and left to cool. Put it into the bowl and stir around so that the sugar dissolves
Put your 25 elderflower heads into the mixture
Slice up 1 unwaxed lemon
Slice up 1 orange
50g (2ozes) citric acid
Add the last three ingredients to your mixture and stir everything up well.
Then put a tea towel over the top of the bowl or bucket so that nothing can drop into it and then leave it to steep for 48 hours.
Use a soup ladle to strain the mixture through a fine strainer or muslin cloth to make sure you end up with a clear liquid.

Elderberries will ripen in the autumn
You won’t have any if you pick all the flowers off the bush in spring

And here is a Salty Sam word search for those of you who like to sit down with a puzzle in your break time/free time…
SALTY SAM
WORD SEARCH
|
S |
T |
O |
R |
Y |
T |
D |
X |
H |
B |
O |
X |
E |
S |
X |
Q |
L |
H |
|
X |
S |
E |
A |
V |
D |
W |
F |
E |
V |
Z |
X |
C |
T |
I |
F |
H |
O |
|
S |
U |
P |
P |
L |
I |
E |
S |
N |
M |
G |
B |
L |
A |
N |
K |
E |
T |
|
T |
N |
D |
S |
V |
V |
L |
T |
R |
F |
M |
E |
Q |
R |
K |
E |
K |
C |
|
O |
X |
D |
B |
B |
I |
L |
L |
Y |
F |
I |
D |
U |
F |
X |
Y |
F |
H |
|
V |
Z |
R |
A |
N |
N |
I |
A |
R |
M |
C |
H |
A |
I |
R |
Z |
I |
O |
|
E |
X |
Q |
R |
B |
G |
E |
Q |
E |
F |
E |
F |
Y |
S |
X |
Z |
S |
C |
|
H |
C |
A |
N |
C |
S |
S |
R |
P |
C |
S |
B |
Z |
H |
N |
M |
H |
O |
|
H |
Z |
X |
E |
C |
U |
P |
B |
O |
A |
R |
D |
Z |
E |
M |
E |
E |
L |
|
N |
J |
Z |
Y |
F |
I |
D |
O |
R |
S |
T |
O |
R |
M |
R |
R |
S |
A |
|
V |
E |
E |
R |
D |
T |
F |
B |
R |
M |
I |
L |
K |
I |
E |
M |
A |
T |
|
C |
L |
O |
U |
D |
S |
R |
B |
I |
X |
C |
P |
X |
L |
W |
A |
V |
E |
|
H |
L |
A |
M |
P |
D |
O |
L |
D |
Z |
Z |
H |
H |
Y |
M |
I |
F |
K |
|
E |
Y |
D |
T |
B |
B |
C |
E |
G |
Z |
W |
I |
N |
D |
R |
D |
A |
Z |
|
S |
F |
E |
C |
O |
O |
K |
I |
E |
S |
B |
N |
S |
H |
E |
L |
L |
S |
|
T |
I |
N |
F |
A |
B |
S |
S |
D |
X |
C |
V |
B |
O |
T |
T |
L |
E |
|
A |
S |
D |
V |
T |
D |
R |
E |
S |
S |
E |
R |
L |
A |
B |
E |
L |
S |
|
Z |
H |
A |
T |
C |
B |
A |
R |
R |
E |
L |
S |
C |
A |
N |
D |
L |
E |
WORDS TO FIND…
CAN TIN FISHES
BOAT MILK COOKIES
STORM BOTTLE PORRIDGE
WIND BARNEY DIVING SUIT
STOVE ARMCHAIR CUPBOARD
STARFISH BLANKET CHEST
MICE SUPPLIES JELLYFISH
CLOUDS MERMAID ROCKS
RAIN DOLPHIN BOXES
KEY WAVE BARRELS
HOT CHOCOLATE HAT LABELS
SUN DRESSER SEA
MAT BILL STORY
EEL BOB SHELLS
CANDLE BED LAMP
WELLIES HENRY INK
BOBBLE EMILY QUAY


*********************
*********************

Quick Quiz
What do these phrases mean?
- many hands make light work
- too many cooks spoil the broth
- home is where the heart is
- a friend in need is a friend indeed
- a problem shared is a problem halved
- too many chiefs and not enough lndians
- working at the coal face
- working in tandem
- ships that pass in the night


lt’s the Weekend!

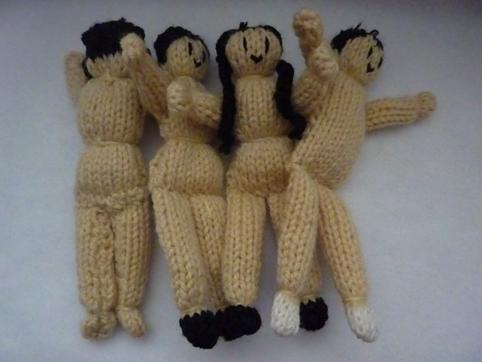
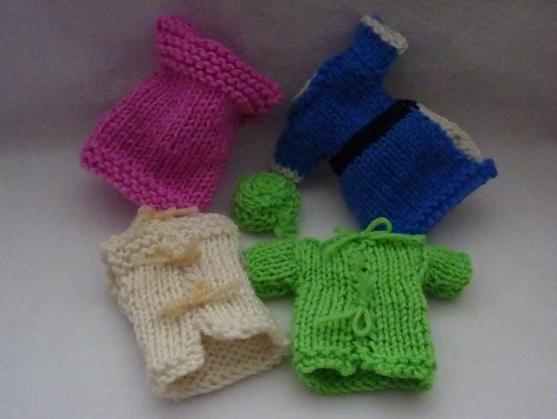
HOW TO MAKE A DOCTOR, NURSE AND PATlENT DOLLS
It is really important that teams of people work well together in hospital.
Sometimes they are even working quickly to save somebody’s life.
Here we have some dolls who work in a hospital.
They are very small dolls but very easy to knit.
You will need 2 x 50g ball of skin-coloured yarn if you want to make a lot of characters.
Just knit the hair if you want a man doll and add more hair in the form of plaits or a bun if you want a woman doll. The dolls here all have black hair but you can give then brown or blonde hair instead.
If you want to make some dolls taller than others, just pull them slightly.
When you sew up the shoulder seams of the clothes, make sure that you only sew them up about 1cm so that there will be enough room to get the doll’s head through.
CHARACTER DOLL
BODY FRONT (KNIT ONE)
Using 4mm knitting needles and skin-coloured yarn cast on 10 stitches
Knit 24 rows of stocking stitch
Change to black yarn to make hair fringe
Knit 2 rows of stocking stitch
Don’t cast off – leave your stitches on the length of yarn left after you cut off your yarn (about 20cm)
BODY BACK (KNIT ONE)
Using 4mm knitting needles and skin-coloured yarn cast on 10 stitches
Knit 20 rows of stocking stitch
Change to black yarn to make back of hair
Knit 6 rows of stocking stitch
Don’t cast off – leave your stitches on the length of yarn left after you cut off your yarn (about 20cm)
PATIENT’S LEGS (KNIT TWO)
Using 4mm knitting needles and skin-coloured yarn cast on 9 stitches
Knit 20 rows of stocking stitch
Don’t cast off – leave your stitches on the length of yarn left after you cut off your yarn (about 20cm)
OTHER CHARACTER’S LEGS (KNIT TWO)
Using 4mm knitting needles and skin-coloured yarn cast on 9 stitches
Knit 16 rows of stocking stitch
Change to black yarn or white yarn to make shoes
Knit 4 rows of stocking stitch
Don’t cast off – leave your stitches on the length of yarn left after you cut off your yarn (about 20cm)
ARMS (KNIT TWO)
Using 4mm knitting needles and skin-coloured yarn cast on 7 stitches
Knit 12 rows of stocking stitch
Don’t cast off – leave your stitches on the length of yarn left after you cut off your yarn (about 20cm)
TO MAKE UP
- Sew up the side seams of the body and head right sides together using over-sew stitching
- Turn the body and head the right way out
- Sew along the inner leg seams using over-sew stitching right sides together and turn the legs the right way out
- Tightly bind the ankles twice around with skin-coloured yarn
- Stuff the legs
- Sew across the top of the legs and the bottom of the body from behind (lay the legs across the stomach as you work) to attach the legs
- Stuff the head and body and pull the top of the head shut – secure the yarn
- Sew a strand of skin-coloured yarn into the back of the neck and wrap it around the neck a couple of times, pull tight and secure the yarn into the centre back of the neck once more
- Embroider a face onto the front of the head using black yarn
- Sew along the under arm seams using over-sew stitching right sides together and turn the arms the right way out
- Tightly bind the wrists twice around with skin-coloured yarn
- Stuff the arms with a little stuffing
- Sew the arms securely to the sides of the body so that they point forward
- Sew some strands of black yarn at the top corners of the face in front of the plaits and all over the head to add bulk – then if you want a woman doll…
- Make plaits by crocheting 7 or 11 chains into a length of black yarn or a bun by crocheting 10 chains into a length of black yarn
- Attach the plaits to the sides of the head or the bun to the top of the head by just curling the crochet work around on top of the hair
TIP
As with all toy making, when you stuff the body, put the stuffing into it in tiny amounts so that you can get the body shape to be exactly as you want it to be.
Now you are ready to make your dolls some clothes.
PATIENT’S GOWN FRONT (KNIT ONE)
Using 4mm knitting needles and white yarn cast on 14 stitches
Knit 2 rows of garter stitch
Knit 18 rows of stocking stitch
Knit 8 rows of garter stitch
Cast off
PATIENT’S GOWN BACKS (KNIT TWO)
Using 4mm knitting needles and white yarn cast on 7 stitches
Knit 2 rows of garter stitch
Knit 18 rows of stocking stitch
Knit 8 rows of garter stitch
Cast off
TO MAKE UP
With right sides together using over-sew stitching
- Sew up shoulder seams
- Sew up side seams
- Tie 3 little bows of yarn into the back seam using skin-coloured yarn to make the tie tapes
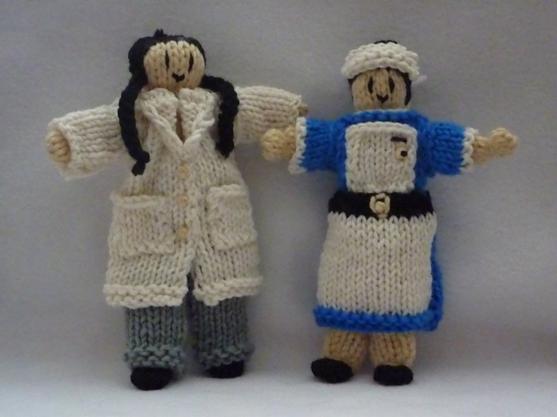
DOCTOR’S COAT BACK (KNIT ONE)
Using 4mm knitting needles and white yarn cast on 16 stitches
Knit 2 rows of garter stitch
Knit 29 rows of stocking stitch
Knit 1 row
Cast off
DOCTOR’S COAT FRONTS (KNIT TWO)
Using 4mm knitting needles and white yarn cast on 10 stitches
Knit 2 rows of garter stitch
Knit 29 rows of stocking stitch
Knit 1 row
Cast off
DOCTOR’S COAT SLEEVES (KNIT TWO)
Using 4mm knitting needles and white yarn cast on 13 stitches
Knit 8 rows of stocking stitch
Cast off
DOCTOR’S COAT POCKETS (KNIT TWO)
Using 4mm knitting needles and white yarn cast on 6 stitches
Knit 6 rows of stocking stitch
Cast off
TO MAKE UP
Focus on the details at the front of the coat before you make up the garment.
- Sew the lapels back into place
- Create 3 buttons on the overlap at the front – right over left for a woman and left over right for a man – by winding a contrasting yarn over a yarn needle 3 times – skin-coloured yarn was used for the coat in the photograph.
- Sew the pockets into place
- With right sides together using over-sew stitching, sew up shoulder seams and then
- Sew the tops of the sleeves into place
- Sew up side seams and under arm seams
DOCTOR’S TROUSERS (KNIT TWO)
Using 4mm knitting needles and grey yarn cast on 14 stitches
Knit 2 rows of garter stitch
Knit 18 rows of stocking stitch
Decrease 1 stitch at the beginning of the next 4 rows of stocking stitch
Knit 4 rows stocking stitch
Slip 1 (p1, k1) repeat these 2 stitches to the last stitch purl 1
Repeat the last row once
Cast off rib-wise to give more stretch to the top of the trousers
TO MAKE UP
With right sides together using over-sew stitching
- Sew up the front and back seam of the trousers on the part that will fit onto the body
- Sew along the inside leg seams with right sides together using over-sew stitching
- Turn the trousers the right way out
TIP
This coat can also be used to dress a pharmacist.
SURGEON’S TUNIC FRONT (KNIT ONE)
Using 4mm knitting needles and green yarn cast on 12 stitches
Knit 2 rows of garter stitch
Knit 21 rows of stocking stitch
Knit 1 row
Cast off
SURGEON’S TUNIC BACKS (KNIT TWO)
Using 4mm knitting needles and green yarn cast on 7 stitches
Knit 2 rows of garter stitch
Knit 21 rows of stocking stitch
Knit 1 row
Cast off
SURGEON’S SLEEVES (KNIT TWO)
Using 4mm knitting needles and green yarn cast on 13 stitches
Knit 6 rows of stocking stitch
Cast off
TO MAKE UP
With right sides together using over-sew stitching
- Sew up shoulder seams
- Sew the tops of the sleeves in place
- Sew up side seams and under arm seams
- Tie 2 little bows of green yarn into the back seam
SURGEON’S TROUSERS (KNIT TWO)
Using 4mm knitting needles and green yarn cast on 14 stitches
Knit 2 rows of garter stitch
Knit 18 rows of stocking stitch
Decrease 1 stitch at the beginning of the next 4 rows of stocking stitch
Knit 4 rows stocking stitch
Slip 1 (p1, k1) repeat these 2 stitches to the last stitch purl 1
Repeat the last row once
Cast off rib-wise to give more stretch to the top of the trousers
TO MAKE UP
With right sides together using over-sew stitching
- Sew up the front and back seam of the trousers on the part that will fit onto the body
- Sew along the inside leg seams with right sides together using over-sew stitching
- Turn the right way out
If you want to make a male nurse, just make up the surgeon’s outfit in white yarn and turn the tunic around the other way. Put buttons down the front seam and pockets on it just like the doctor’s coat.
SURGEON’S CAP (KNIT ONE)
Using 4mm knitting needles and green yarn cast on 10 stitches
Knit 4 rows of garter stitch
Cast off
Using 4mm knitting needles and green yarn cast on 16 stitches
Cast off
TO MAKE UP
- Sew up back seam of cap
- Curl the top around and secure into a spiral of knitting with stitches of yarn
- Sew the top of the cap into place
NURSE’S CAP (KNIT ONE)
Leave ends of yarn long enough to tie around the back of the head
Using 4mm knitting needles and white yarn cast on 8 stitches
Knit 4 rows of garter stitch
Cast off
Take the two ends of yarn to the centre of the sides and leave to use to tie the cap onto the front of the head and bun
NURSE’S UNIFORM BODICE (KNIT TWO)
Using 4mm knitting needles and blue yarn cast on 12 stitches
Knit 2 rows of garter stitch
Knit 13 rows of stocking stitch
Knit 1 row
Change to white yarn
Cast off
NURSE’S UNIFORM SLEEVES (KNIT TWO)
Using 4mm knitting needles and white yarn cast on 13 stitches
Change to blue yarn
Knit 4 rows of stocking stitch
Cast off
NURSE’S UNIFORM SKIRT FRONT (KNIT ONE)
Using 4mm knitting needles and blue yarn cast on 16 stitches
Knit 2 rows of garter stitch
Change to white yarn
Knit 14 rows of stocking stitch
Change to black yarn
Knit 2 rows of stocking stitch
Cast off
NURSE’S UNIFORM SKIRT BACK (KNIT ONE)
Using 4mm knitting needles and blue yarn cast on 16 stitches
Knit 2 rows of garter stitch
Knit 14 rows of stocking stitch
Change to black yarn
Knit 2 rows of stocking stitch
Cast off
NURSE’S APRON TOP (KNIT ONE)
Using 4mm knitting needles and white yarn cast on 8 stitches
Knit 8 rows of stocking stitch
Cast off
TO MAKE UP
Focus on the details at the front of the dress before you make up the garment.
- Sew the apron top onto the bodice front around the sides and bottom
- Embroider a watch onto the top corner – sew on a ‘T’ shape and then put a French knot inside another at the bottom of it
- Lay the top of the skirt onto the bottom of the bodice, ease into place and sew along belt
- Embroider a belt buckle onto the centre of the belt
- Sew the back pieces of dress together in the same way
- Sew the shoulder seams together using over-sew stitching with right sides together in a way that the white strip is enclosed into the seam – the white yarn will then create a white collar on the dress
- Sew the tops of the sleeves into place
- Then sew the under arm seams and side seams of dress
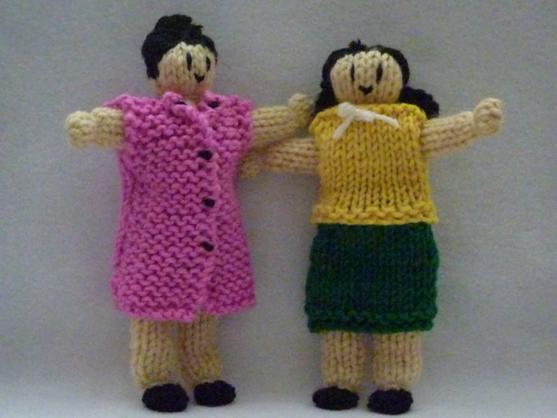
ADMINISTRATOR’S TOP (KNIT TWO)
Using 4mm knitting needles and yellow yarn cast on 12 stitches
Knit 2 rows of garter stitch
Knit 15 rows of stocking stitch
Knit 1 row
Cast off
ADMINISTRATOR’S SKIRT (KNIT TWO)
Using 4mm knitting needles and green yarn cast on 14 stitches
Knit 2 rows of garter stitch
Knit 10 rows of stocking stitch
Decrease 1 stitch at the beginning of the next 2 rows of stocking stitch
Slip 1 (p1, k1) repeat these 2 stitches to the last stitch purl 1
Repeat the last row once
Cast off rib-wise to give more stretch to the top of the skirt
HOSPITAL VISITOR’S COAT BACK (KNIT ONE)
Using 4mm knitting needles and pink yarn cast on 14 stitches
Knit 4 rows of garter stitch
Knit 18 rows of stocking stitch
Knit 8 rows of garter stitch
Cast off
HOSPITAL VISITOR’S COAT FRONTS (KNIT TWO)
Using 4mm knitting needles and pink yarn cast on 8 stitches
Knit 40 rows of garter stitch
Cast off
TO MAKE UP
- Sew the lapels back into place by securing a French knot into each centre – use a contrasting colour and wind the yarn around your needle 3 times
- Create 3 buttons on the overlap at the front in the same way – right over left for a woman black yarn was used for the coat in the photograph
- With right sides together using over-sew stitching, sew up shoulder seams and then
- Sew up side seams and under arm seams
TIP
If making the dolls for small children, you may want to not put tiny bows on the clothing and sew the nurse’s cap to her head with sewing thread.
Please note that the material on this blog is for personal use and for use in classrooms only.
It is a copyright infringement and, therefore, illegal under international law to sell items made with these patterns.
Use of the toys and projects is at your own risk.
©Christina Sinclair Designs 2015
Answers to the News Desk Quiz
|
S |
T |
O |
R |
Y |
|
|
|
H |
B |
O |
X |
E |
S |
|
|
|
H |
|
|
S |
E |
A |
|
D |
W |
|
E |
|
|
|
|
T |
I |
|
|
O |
|
S |
U |
P |
P |
L |
I |
E |
S |
N |
|
|
B |
L |
A |
N |
K |
E |
T |
|
T |
N |
|
|
|
V |
L |
|
R |
|
M |
E |
Q |
R |
K |
E |
|
C |
|
O |
|
|
B |
B |
I |
L |
L |
Y |
|
I |
D |
U |
F |
|
Y |
F |
H |
|
V |
|
R |
A |
|
N |
I |
A |
R |
M |
C |
H |
A |
I |
R |
|
I |
O |
|
E |
|
|
R |
|
G |
E |
|
|
|
E |
|
Y |
S |
|
|
S |
C |
|
|
C |
A |
N |
|
S |
S |
|
P |
|
|
|
|
H |
|
M |
H |
O |
|
|
|
|
E |
C |
U |
P |
B |
O |
A |
R |
D |
|
E |
|
E |
E |
L |
|
|
J |
|
Y |
|
I |
|
O |
R |
S |
T |
O |
R |
M |
|
R |
S |
A |
|
|
E |
|
|
|
T |
|
B |
R |
M |
I |
L |
K |
I |
|
M |
A |
T |
|
C |
L |
O |
U |
D |
S |
R |
B |
I |
|
|
P |
|
L |
W |
A |
V |
E |
|
H |
L |
A |
M |
P |
|
O |
L |
D |
|
|
H |
|
Y |
|
I |
|
|
|
E |
Y |
|
|
B |
B |
C |
E |
G |
|
W |
I |
N |
D |
|
D |
|
|
|
S |
F |
|
C |
O |
O |
K |
I |
E |
S |
|
N |
S |
H |
E |
L |
L |
S |
|
T |
I |
N |
|
A |
B |
S |
|
|
|
|
|
B |
O |
T |
T |
L |
E |
|
|
S |
|
|
T |
D |
R |
E |
S |
S |
E |
R |
L |
A |
B |
E |
L |
S |
|
|
H |
A |
T |
|
B |
A |
R |
R |
E |
L |
S |
C |
A |
N |
D |
L |
E |
Quick Quiz Answers
- many hands make light work – when lots of people help, a job can be completed quickly
- too many cooks spoil the broth – when too many people are making decisions about a task you can end up with a confusion or problem – clear leadership is needed
- home is where the heart is – you feel at home in a place where you are happy
- a friend in need is a friend indeed – when someone helps you at a time when you have problems they are a good friend to have
- a problem shared is a problem halved – if you talk to someone about your problems, you can feel as though a burden has been lifted from you
- too many chiefs and not enough lndians – too many people are taking it upon themselves to take control and there are not enough people doing some work
- working at the coal face – working at the front line (like with customers or patients or students) rather than someone working in a back office
- working in tandem – two (or sometimes more) people working closely together/on the same equipment/on the same project
- ships that pass in the night – people who meet once or twice for a short period of time and then do not see each other again

A tandem