Salty Sam’s Fun Blog for Children
Post Number 50
The Magic Beak Fortune Teller
Hello Everyone

ln their art class this week, Bill and Bob my nephews learnt about origami.
Miss Pringle their class teacher at the Rocky Bay Primary School explained that origami is a Japanese word which means ‘folding paper’.
Origami is the art of folding paper to make paper objects like: boxes, birds, frogs, mice, rabbits – in fact many, many things.
lf you use more than one sheet of paper, it is called modular origami.
The Japanese have been practising origami for over four hundred years.
Miss Pringle said it was best to start on something quite easy, so she taught all the children in her class how to make a magic fortune teller.
This is how it is done:-
- Start with a square piece of paper with sides 15-20cm
- Fold it in half so that it looks like a rectangle
- Crease the paper and open it flat again
- Fold it in half the other way to again make a rectangle
- Crease the paper and open it flat again
- Now fold the four corners into the centre
- Turn the whole thing over and fold the four corners into the centre again
- Turn the square over and you will see that you have four squares facing you
- Fold the shape in half and open it again
- Fold it in half the other way and open it again
- Push your thumbs and two fingers of each hand into the four sections and the model will move in two ways
- Put numbers 1-8 on the triangles inside or maybe a picture of an animal or object
- You can then write words under the flaps. These can be answers to questions, decisions to make, fortunes to be told, etc.
- Ask a person to ask you a question and give you a number up to ten
- Move the fortune teller that number of times and ask the person to choose a number or animal or whatever that they see inside
- Lift up the flap and that is your answer
Try it out on your friends!
Bye bye everyone – don’t forget to subscribe to my blog!
Love and kisses
Salty Sam

www.christina-sinclair.com
![]()
Bill and Bob’s Joke of the Week![]()
![]()
Bob: What feature do witches love most on their computers?
Bill: l don’t know. What feature do witches love best on their computers?
Bob: The spell checker!
Salty Sam © Christina Sinclair 2015
Unauthorized use and/or duplication of material from this blog without express and written permission from this blog’s author and owner is strictly prohibited.
Links may be used to www.christina-sinclair.com
Picture Gallery
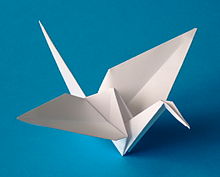
An origami crane
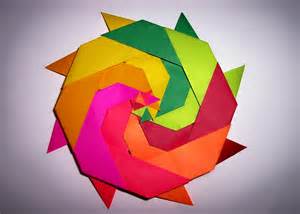
Modular origami
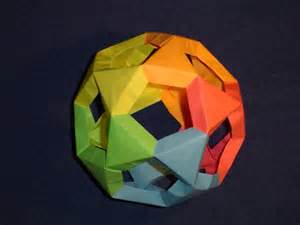
Modular origami
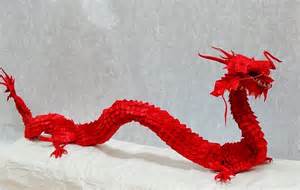
An origami dragon
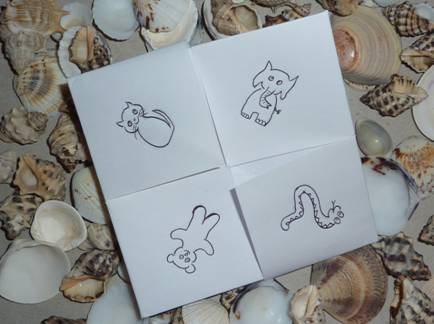
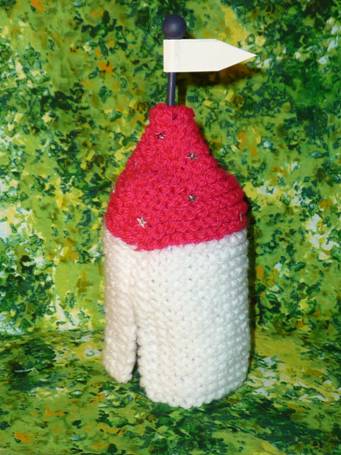
The outside decoration of Bill and Bob’s magic fortune teller
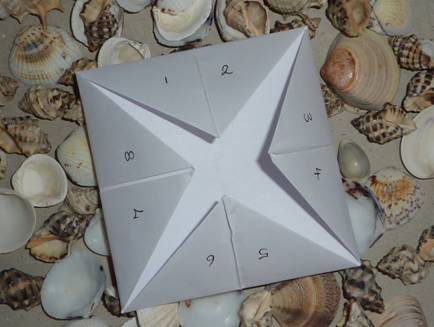
The inside of Bill and Bob’s magic fortune teller
Choose a number and see your fortune!
![]()
 THE SALTY SAM NEWS DESK

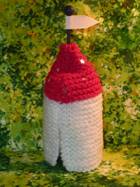
In the Rocky Bay Funfair, there is a fortune teller’s tent. It looks a little bit like a mediaeval tent with a pennon (or flag) on the top.
If you would like to make your own fortune teller’s tent like the one in the picture, the knitting pattern for it is here. If you have only learnt the knit stitch and not the purl yet, don’t worry because the tent is made in garter stitch. That means that every row is knitted.
Garter stitch makes the walls and roof stiffer.
It doesn’t take up much yarn, and of course you can knit it in any colour you want, so you could use left-overs from your knitting yarn store/bag/cupboard.
You could even make a striped tent if you wanted to.
Each piece of knitting is a side of the tent so you will need to knit 2 pieces.
NEWSDESK MINIMAKE
FORTUNE TELLER’S TENT
FORTUNE TELLER’S TENT (KNIT TWO)
Using 4mm knitting needles and white dk yarn cast on 18 stitches
Knit 30 rows in garter stitch
Change to pink dk yarn
Knit 6 rows of garter stitch
Decrease 1 stitch at the beginning of the next 14 rows
Cut the yarn off with a 30cm/12 inch end to spare, pull this through your last 4 stitches

So this is how you make up the tent:
- Sew sequins on the roof and also the sides if you like or decorate the knitting in some other way.
- Sew the back seam all the way down and the front seam only half way down using over-sew stitches and right sides together.
- Of course your tent won’t stand up on its own so you will need something to prop it up. Take the inside of a roll of lavatory paper and cut an arched doorway in it at one end. This door will allow the fortune teller to get into her tent. Position the door behind the tent flaps at the front.
You might want to stick a sand castle flag in the top or even make your own to finish off the tent.
If you have some mediaeval soldiers that you play with, you may like a whole encampment of tents like this. You can make knights’ pennons to go on the top of the tents using cardboard.

*********************
*********************

Quick Quiz
What do these phrases mean?
- to do something at the drop of a hat
- l’ll eat my hat
- to keep something under your hat
- to pass/send round the hat
- to take your hat off to someone
- to talk through your hat
- to throw your hat into the ring
![]()
BLOW MY FOGHORN!!!
PLUS
Salty Sam fans can join in with their comments and share them with children all over the world. You will need permission if you are not an adult.
Enter your e-mail address to subscribe to my blog and receive new Salty Sam Blog Posts for free by e-mail every week. Your address will be kept private and will not be shared with any third party.
Sign me up at the side bar

![]()
lt’s the Weekend!
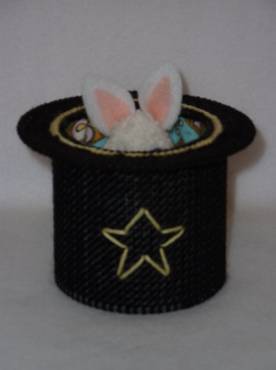
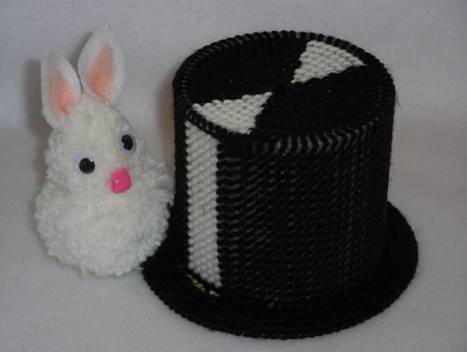
HOW TO MAKE A MAGlC HAT BOX
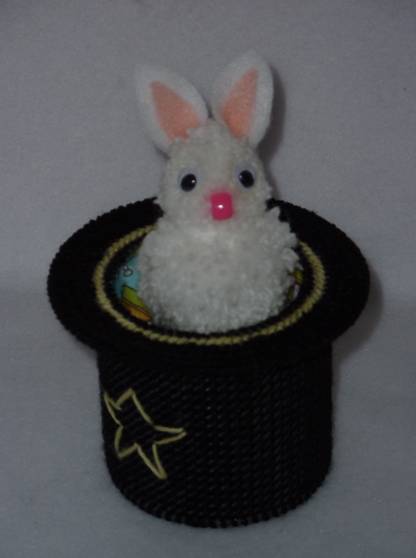
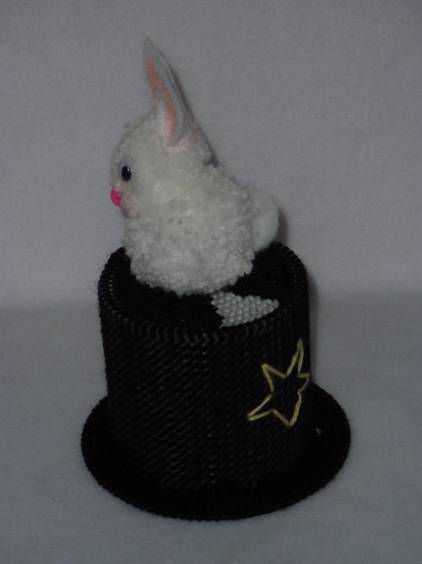
This is a place where you can keep your magic beaks – and there is also a magic rabbit living there to guard them!
You will need 2 round plastic canvas shapes 10.8cm/4¼ inches
A plastic canvas panel 19 holes by 65 holes (double check this fits around your circular base before you cut the panel)
A piece of material 28cm by 9cm (11 inches by 3 ½ inches)
A piece of fabric 10cm/4 inches in diameter
Some white, black and yellow yarn
The rabbit needs some left over white yarn, white and pink felt, a white bobble, a pink bead and two eyes.
You will be able to pull the fabric up from inside the hat to let the rabbit sit on the top of the hat and then you can push him down into the hat.
THE HAT
- Sew the ends of the long fabric piece together (right sides together).
- Run two lines of running stitches around the circle of fabric and gather, then fit the circle into one end of the tube making sure that the right sides of both fabric pieces match.
- Cut one circular plastic panel with a 5 hole rim (hat rim) and the other with a 3 hole rim (the centre will be the hat top).
- Cover the hat rim with black diagonal stitches across the brim and back stitch stitches along the brim – but run a line of yellow stitches on the second line in from the centre hole to add decoration.
- Stitch two triangles of white stitches onto the top of the hat to create a ‘shine’ and cover the rest of the surface with black stitches.
- Create a ‘shine’ on the long panel by covering a block of squares from top to bottom (5 squares across) with white diagonal stitches near to one end. Cover the rest of the panel with black diagonal stitches avoiding the edges. Sew a yellow star into the centre of the panel.
- Sew the ends of the long panel together, and the end of the tube to the base of the hat, using over-sew stitches in black yarn.
- Over-sew the top edge of the hat sides (making sure that you pull the top of the side seam as much as you can) and then insert the hat lining with right sides of fabric showing – use sewing thread to secure into place but don’t bring the fabric quite to the top.
- Sew the brim onto the hat by putting the palm of one hand firmly onto the brim and sewing your yarn needle in and out through the brim and just catching the top of the sides (pushing outwards). You might need an adult to do this for you if you find it too difficult.
THE RABBIT
- To make the rabbit you will need two circles of card 6cm/2½ inches in diameter with a 2½cm hole and two 4cm/1¾ inches in diameter with a 2cm hole (you can use small coins to mark the holes).
- Wind the white yarn around two hoops of the same size until you have made a pad and then cut around the edges and tie tightly into a bobble.
- Sew the different size bobbles together and add a pompom tail.
- Cut the ears in paper first to get the right size and shape for your rabbit before you cut them in felt and sew them to the sides of the head by just anchoring them at the base.
- Sew on a pink bead to make a twitchy nose and glue on two eyes.

Please note that the material on this blog is for personal use or for use in classrooms only.
It is a copyright infringement and, therefore, illegal under international law to sell items made with these patterns.
Use of the toys and projects on all of these blogs is at your own risk.
©Christina Sinclair Designs 2015
![]()
And here is the answer to last week’s puzzle…
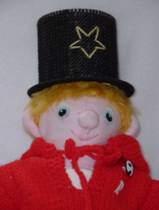
Meet me behind the bicycle sheds at 3 o’clock – Bill
Okay Bill I will race you home – Bob
Whoever gets home last has to tidy up our bedroom – Bill
Be careful how you cross the roads! – Uncle Sam
![]()
Quick Quiz Answers
- to do something at the drop of a hat –
- l’ll eat my hat –
- to keep something under your hat –
- to pass/send round the hat –
- to take your hat off to someone –
- to talk through your hat –
- to throw your hat into the ring –
- to do something immediately and for the slightest reason
- l’ll be amazed if what l believe isn’t true
- to keep something a secret
- to collect money from people for something or someone
- to show someone admiration
- to talk nonsense
- to challenge someone